| Game | Walkthrough | Gallery | Soundtrack | Changelog | Theories |
|---|
Complete effects guide for .flow (ver.0.194).
Video Guide[]
A visual guide for all 24 effects, plus the three Empty Boxes collected as Rust.

Effects Guide[]

Headphones (ヘッドフォン)[]
Put on Headphones

Appearance: Sabitsuki wears orange colored headphones.
Passive Effect: None.
Action: (Shift) Music is played along with little notes coming out.
Location: Found in Music//Neon World.
Practical Uses: None.
Head right and into the Neon World. From the door, head right until you reach the glowing blue tiles, and head south. Continue on past the hand until you reach a white figure that appears to be head bopping. Interact with it to gain the headphones effect.
Iron Pipe (てつパイプ)[]
Use an Iron Pipe

Appearance: Sabitsuki wields an iron pipe.
Passive Effect: NPCs move away from Sabitsuki.
Action: (Shift) Sabitsuki changes the style in which she holds the item.
Location: Found in Utility Pole World//Pipes World.
Practical Uses: This effect allows Sabitsuki kill some NPCs (which sometimes leave behind money) and access some hidden areas.
Take the west door into the Pipe World. Head south until you reach two pipes, one laying on its side. Head straight to the left. Standing in the center of a ring of pipes is a bloody metal pipe, interact with it to get this effect.
Ghost (ゆうれい)[]
Become a Ghost

Appearance: Sabitsuki is turned into a ghost, complete with a Japanese triangle headband on her head.
Passive Effect: None.
Action: (Shift) Sabitsuki becomes transparent. Pressing it again returns her to normal.
Location: Found in Flower World.
Practical Uses: This effect allows Sabitsuki avoid active Kaibutsu.
- Note: She is not invulnerable; running into a Kaibutsu will result in her being transported.
Enter the Pipe world to the left. Head south until you reach the laying pipe, then head right until you reach a staircase. Enter the staircase and head into the apartments. From here, turn right and enter the first door you reach. Enter the purple door in the room. In the Industrial Snow world, head left until you see the first mass. Enter the door to the north, interact with the flower, and then leave. From here, head left until you reach a pole, then head south and into the staircase. Follow the path to enter the Plant Labyrinth. Head left and take the door to the north, Enter the next room and, once being teleported to a room with two heart monitors next to you, head north and slightly to the right and enter the brown building. Take the door to the right, then hold right and go slightly north. Enter the doors to reach the Ghost Garden. Head south to the first grey blob, then move to the left until you see a ghost girl surrounded by some flowers. Interact with her to get the ghost effect.
Mono Eye (モノアイ)[]
Become a Mono Eye

Appearance: Sabitsuki becomes a red-eyed cyclops. This eye takes up almost all of her face.
Passive Effect: None.
Action: (Shift) Sabitsuki faces the camera and blinks.
Location: Found in Dysmorphic World//Mouth and Eyes World.
Practical Uses: As of ver.0.15, the eyeball graffiti in the Apartments blinks if you use the Mono Eye effect on it.
Enter the Mouth and Eyes world to the north. Head left until you see two mouth figures and two eye figures facing eachother, then head north until you see a bloody eyeball between some more figures. Interact with the eyeball to gain the monoeye effect.
Diving Helmet (せんすいふく)[]
Wear a Diving Helmet

Appearance: Sabitsuki has an orange diving helmet on. Resembles Oreko's helmet.
Passive Effect: None.
Action: (Shift) Causes bubbles to silently float out from the helmet.
Location: Found in Submarine World.
Practical Uses: This effect will let you increase friendship with Oreko if you interact with her (when she's not working on her machine) with the effect equipped.
Enter the Ghost Garden World to the south. Go south from the door until you reach a bed of white flowers then go right. go between the two sand pillars surrounded by flowers. Go right until you reach the underwater area. From there go south. When you're in the larger area, go south-west until you see a sandy square house. Enter it and interact with Oreko (the girl working on the machine) to get the effect (you may have to exit/reenter the house if she's asleep.)
Cat (ねこ)[]
Become a Cat

Appearance: Sabitsuki grows cat ears and a cat tail.
Passive Effect: None.
Action: (Shift) Sabitsuki turns into an albino cat with a high pitched 'meow'.
Location: Found in Rainbow Maze.
Practical Uses: In cat form, Sabitsuki can fit through small gaps in certain areas.
Head to the Neon World to the right. Turn right until you reach the furthest blue block in the starting area, then head all the way south until you reach the hand. From the middle of the palm, head right again. You'll see two red blobs that appear to be emanating some sort of gas. Walk between them to reach the Heart Tile Path. Follow it along to enter the Hospital. At the 4-way parting, take whatever path has the most blood. This'll get you to the Bone Maze. From here, follow the path north and take the first left. Continue along to the second north path (next to it is a rounded white "bone" covered in blood) and head north. Go right and down the ladder, this'll take you to the sewers. Go left until you see a bright doorway with railing on both sides, enter it to reach the Sugar Hole. From here go left until you reach a different part of the sewers with a waterfall to your right. Go left again and take the ladder going up to reach the City Coast.
Go left from where you enter and keep going left until you reach a flashing rainbow door. Go left and enter another flashing rainbow door. This will bring you to the Rainbow Maze. From where you enter the larger area, you'll want to go down and left and enter the first door you see. Keep going as far left as you can (you'll have to go down slightly, the key thing is avoid going up) until you can't anymore and enter the door. When you enter, it should just be a straightforward path, follow it and there should be a white cat wandering around Interact with it to get the effect.
Broom (ほうき)[]
Ride a Broom

Appearance: Sabitsuki wears a blue witch dress, has her hair tied up in a ponytail with a red ribbon and rides a broom.
Passive Effect: Sabitsuki travels at double her walking speed.
Action: (Shift) Allows Sabitsuki to get off her broom and walk normally.
Location: Found in Witch's House in Famicom World.
Practical Uses: Can be used to travel through the dream world a lot faster, chase fast-moving NPCs.
Enter the Pipes world to the left. From the door, head south until you see the laying pipe, then head directly right and enter the door. Down the staircase you'll reach the Apartments. From here, go all the way right, and head up to the roof. Interact with the grey cube to reach the Isometric Pathway. Head north and take the path on your left. Go down the staircase and past the static room to reach the Famicom World. Follow the path along and head north until you see the Witch's House. Enter the house and interact with the witch to get the broom effect.
Watering Can (じょうろ)[]
Use a Watering Can

Appearance: Sabitsuki holds a watering can.
Passive Effect: None.
Action: (Shift) Causes it to rain, it will become heavier if you press it more than once; subsequent presses change the amount of rain or turn the rain off. It`s the equivalent of the Umbrella effect in Yume Nikki.
Location: Found in Ghost Garden World.
Practical Uses: Can be used to put Takibi-san's fire out. If you stop the rain without leaving the area, Takibi-san will re-light her fire with a small lighter.
Enter the Ghost Garden World to the south. Head north from the door until you reach a bed of white flowers. From there go left until you see a large white ghost standing among a group of white flowers placed triangularly. There should be a ghost girl holding a watering can in front of them. Interact with the ghost girl to get the effect.
Whistle (ホイッスル)[]
Blow a Whistle

Appearance: Sabitsuki has an orange whistle in her mouth.
Passive Effect: None.
Action: (Shift) Movable NPCs move in the direction Sabitsuki is facing.
Location: Found in Flesh Walls World.
Practical Uses: Can be used to summon Little Sabitsuki in the Industrial Snow World.
Head to the Neon World to the right. Turn right until you reach the furthest blue block in the starting area, then head all the way south until you reach the hand. From the middle of the palm, head right again. You'll see two red blobs that appear to be emanating some sort of gas. Walk between them to reach the Heart Tile Path. Follow it along to enter the Hospital (not to be confused with the Alleyway Hospital). At the 4-way parting, take whatever path has the most blood. This'll get you to the Bone Maze. From here, follow the path north and take the first left. Continue along to the second north path (next to it is a rounded white "bone" covered in blood) and head north. Enter the open, dripping mouth. Take the toothy door to the north. This takes you to the Flesh Walls World. From here, simply enter the door with the black-haired girl in front of it. You'll find the whistle effect to the right of the room, next to the girl on the throne.
Gas Mask (ガスマスク)[]
Wear a Gas Mask

Appearance: Sabitsuki wears a gas mask.
Passive Effect: None.
Action: (Shift) Sabitsuki slightly raise mask, revealing the bottom half of her face.
Location: Found in Plant Labyrinth.
Practical Uses: None.
Enter the Pipes World to your left. Go south from the door until you see a horizontal pipe. Go right from that and enter the gray building. Go down the stairs and enter the Apartments. Go right and enter the first door you see. Enter the Purple door to the Industrial Snow World. Go north-east from the door and you should see an entrance blocked off by a smoking pipe. Go right past that and enter the cylinder-shaped building in between two smoking pipes. Interact with the flower and leave. Go down until you're right beside a big smoking pipe, go right and into the entrance that was previously blocked off. Go down the stairs and through the hall. Enter the doorway when the flowers block the way and enter the vine-covered door. This will take you to the first part of the Plant Labyrinth.
From where you enter, go left and enter the first doorway you see. Go north from the heartbeat monitors until you see the nurse. Go slightly left and up past her and enter the house. This should take you to a hallway with a passive kaibutsu. Go left and enter the doorway. In the next area, go all the way to the left and enter the door. Go north and interact with the red monster puffing smoke.
Machine (きかい)[]
Become a Machine

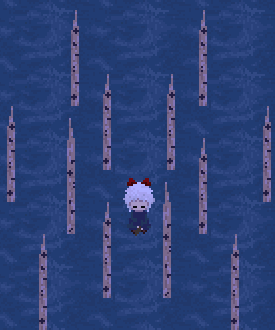
A collection of reeds that you can go through get to the Starry Pier via Underwater World
Appearance: Sabitsuki's arms and legs are replaced with robotic limbs, and there is now a device attached to her head.
Passive Effect: None.
Action: None.
Location: Found in Starry Pier.
Practical Uses: None.
Enter the Ghost Garden World to the south. Go south from the door until you reach a bed of white flowers then go right. Go between the two sand pillars surrounded by flowers. Go right until you reach the underwater area. From there, go north and enter the Underwater Temple. From where you start, go: Right, Up, Up, Left, Left, Right. This will bring you to the entrance of the Dark Corridors (there will be a silhouette of Sabitsuki on the wall). Enter the door. Keep following the lights on the path. Where the path splits, take the upwards path to reach the Decaying Art Gallery. Enter the north-east door to reach the Prison.
In the prison, go north-east and find a room that has two cloaked figures holding scythes flanking a guillotine. Interact with the guillotine to enter Hell. Go right and down, interact with the NPC that is sitting down to reach the Starry Pier. Go up the stars and enter the first door you see. Go south-east from the entrance and interact with the table.
OR
Enter the Ghost Garden World to the south. Go south from the door until you reach a bed of white flowers then go right. Go between the two sand pillars surrounded by flowers. Go right until you reach the underwater area. From there, go south to reach a vaster area. Go south-west until you see Oreko's house. Go south west from that until you see a bunch of reeds placed together symmetrically. Go between them and down, you should see the top of a stairway. Go down the stairs and enter the doorway. Go south-east from the entrance and interact with the table.
Dharma (だるま)[]
Become a Dharma Doll (note: Translations of earlier versions refer to this effect as Tumbling Doll)

Appearance: Sabitsuki has no arms or legs and the stumps are bleeding.
Passive Effect: Slows Sabitsuki down.
Action: (Shift) Sabitsuki fall over and crawl slowly. Once she falls, she cannot pick herself back up.
Location: Found in Cleaner World.
Practical Uses: None.
Enter the Pipes world to your left. Head down from the door until you reach a downward pipe. Go right and enter the building. Go downstairs to the Apartments. Go right until you reach another staircase and head up to the roof. Interact with the floating block to reach the Isometric Pathway. Take the path to your right (avoid the chasers), go right and interact with another floating block. Go down the stairs to the second Apartments. Go all the way to the right and take the elevator. Go right until you reach a room with tables. Enter the door in the middle and interact with the painting behind the maid. From there, go down, go left until you see a door and go up (avoid the chaser). Go upwards until you see an upward stretch with blood spattered everywhere and a maid with a chainsaw at the end of it. Interact with the bloody chainsaw to obtain the effect.
Slime (スライム)[]
Become a Slime

Appearance: Sabitsuki turns into a green hunk of slime.
Passive Effect: None.
Action: (Shift) Causes Sabitsuki to melt, then regain her previous form.
Location: Found in Rusty Pier.
Practical Uses: None.
Follow the instructions for the Cat effect, up until you enter the sewers. When you enter the sewers, go left. On the very next screen, walk onto the gray platform closest to the bottom of the screen and go right. This will bring you to an area with a giant slime with an entrance beside it. Go up the ladder and take the path to the right. This will bring you to the Rusty Pier. From here, go: Right, Up, Right as far as you can, Down, Left, Down again and Left. Interact with the moving green slime.
Arms (うで)[]
Increases the number of Arms

Appearance: Sabitsuki grows five arms and has her hair tied up in pigtails.
Passive Effect: None.
Action: (Shift) Sabitsuki will cross all her arms.
Location: Found in Microscopic World.
Practical Uses: This effect allows Sabitsuki to teleport to the Nexus at will.
Enter the Neon World to your right. Turn right until you reach the furthest blue block in the starting area, then head all the way south until you reach the hand. From the middle of the palm, head right again. You'll see two red blobs that appear to be emanating some sort of gas. Walk between them to reach the Heart Tile Path. Follow it along to enter the Hospital. At the 4-way parting, take whatever path has the least blood splatters (you will have to do this 3 times). This'll bring you to a room with a bed and a broken monitor. Interact with the monitor on the wall. Interact with the large computer monitor in the Underwater area.
In the Geometry World, go down and right by a small cross-shaped sculpture and go into the middle of a cluster of cylinders. Keep going up to enter the Microscopic World. Interact with a snowflake-like thing to move outside the path. From here, go left until you see another path with halls jutting out at the top and right of it. Go north of that until you see an arm in the middle of another path. Interact with it.
Viscera (ないぞう)[]
Viscera falls out

Appearance: Sabitsuki's intestines are spilling out of her stomach. There are also bloodstains on her hands.
Passive Effect: None.
Action: (Shift) Sabitsuki tries to put them back in.
Location: Found in Flesh Walls World.
Practical Uses: None.
Follow the Whistle effect guide to get to the Flesh Walls world. From here, head south and go either left or right as this room loops. Head north into the door. Head all the way north until you get to a split. Take the door on the right. Head south, take the left path and then the right path and enter the door there. You'll see tentacle-like things sprouting from the ground with another split in the path. Take the door to the right, with the open mouths. Head north and slightly to the left, then at the junction head south. A little to the north, you'll see two rusty circles. Enter them and quickly wrap around it and enter it from the south (entering without wrapping around causes you to simply come back out as normal). This'll give you access to the door in front of you. Enter the door and interact with the dead body directly to the north to receive the viscera effect.
Psychedelic (サイケデリック)[]
Become a Psychedelic

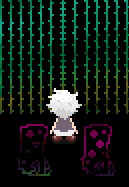
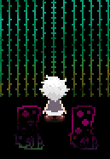
The line you have to interact with to get to the effect
Appearance: Sabitsuki turns into bright colors.
Passive Effect: None.
Action: (Shift) Sabitsuki changes colors from a set of 8 different appearances.
Location: Found in Psychedelic Town.
Practical Uses: None.
Follow the instructions for the Cat effect. Once you enter the flashing rainbow door, turn back and enter it again. go right until you see a strand on the wall that's noticeably different from the others. Interact with it to reach the rooftops of the Psychedelic Streets. Interact with the following NPCs to reach the effect: blue, pink, blue, pink (top one), blue (bottom one), blue again (bottom) and finally the multi-coloured one to obtain the effect.
Handgun (けんじゅう)[]
Carry a Handgun

Appearance: Sabitsuki holds a handgun.
Passive Effect: None.
Action: (Shift) Sabitsuki fires the handgun in the air. Pressing it 5 times will make her reload the gun.
Location: Found in the Alleways.
Practical Uses: Causing nearby NPCs to back away.
- The path to getting this effect is slightly different between version 0.19 and earlier versions.
- Ver. 0.192
Enter the Pipes world to your left. Head down from the door until you reach a downward pipe. Go right and enter the building. Go downstairs to the Apartments. Go right until you reach another staircase and head up to the roof. Interact with the floating block to reach the Isometric Pathway. Take the path to your right (avoid the chasers), go right and interact with another floating block. Go down the stairs to the second Apartments. Go all the way to the right and take the elevator. Go right until you exit the building. From here, go left and enter the wide alleyway. Entering, go left, take the first path up, go left, up again and right. Interact with the bin to get the effect.
- Earlier Versions
Enter the Pipes world to your left. Head down from the door until you reach a downward pipe. Go right and enter the building. Go downstairs to the Apartments. Go right until you reach another staircase and head up to the roof. Interact with the floating block to reach the Isometric Pathway. Take the path to your right (avoid the chasers), go right and interact with another floating block. Go down the stairs to the second Apartments. Go all the way to the right and take the elevator. Go right until you exit the building. Go left and enter the white building. Go up, enter the doorway on the far left at the back to enter the Meatworks corridor. Go up and take the leftwards path. Interact with the bin to get the handgun effect.
Corpse (したい)[]
Become a Corpse

Appearance: Sabitsuki is turned into a purple corpse.
Passive Effect: None.
Action: None.
Location: Found in the Prison.
Practical Uses: None.
Follow the guide for the Machine effect to reach the Prison. Go north-east and enter the room with the guillotine. From here, go left and slightly up. You should see a door between two wide sections of prison bars. Enter the door then go all the way up until you see a purple corpse on the ground. Interact with it. This effect turns Sabitsuki into a purple corpse.
Black Hoodie (くろフード)[]
Wear a Black Hoodie

Appearance: Sabitsuki wears a black hoodie.
Passive Effect: None.
Action: (Shift) Sabitsuki lowers or raises her hood.
Location: Found in Hospital.
Practical Uses: None.
Enter the Pipes World to your left. Go south from the door until you see a horizontal pipe. Go right from that and enter the gray building. Go down the stairs and enter the Apartments. Go right and enter the first door you see. Enter the Purple door to the Industrial Snow World. From there, go near the middle of the map where you'll find a small staircase leading down. Once inside, follow the path to the Underground World. Keep going up and right and eventually you'll be in a small room with a creature and a television. The hoodie is on the ground.
School Uniform (せいふく)[]
Wear a School Uniform

Appearance: Sabitsuki wears a school girl uniform similar to the Kaibutsu.
Passive Effect: None.
Action: None.
Location: Found in the School.
Practical Uses: None.
Head to the Neon World to the right. Turn right until you reach the furthest blue block in the starting area, then head all the way south until you reach the hand. From the middle of the palm, head right again. You'll see two red blobs that appear to be emanating some sort of gas. Walk between them to reach the Heart Tile Path. Follow it along to enter the Hospital. At the 4-way parting, take whatever path has the most blood. This'll get you to the Bone Maze. From here, follow the path north and take the first left. Continue along to the second north path (next to it is a rounded white "bone" covered in blood) and head north. Go right and down the ladder, this'll take you to the sewers. Go left and get onto the grey platform at the bottom of the screen. Go right to the area with the giant slime. Go up the ladder beside it and go right.
This'll take you to the Rusty Pier. From the entrance, go: Right, Up, Right as far as you can, Down, first Right, Up, Right and Up again. Interact with the streetlamp. Go left and enter the stairway. Follow the stairway. Go up when you exit and enter the School. Enter the doorway to your right. You can go either left/right and enter the bottom door. Go down the staircase in the middle of the hall. Enter the doorway to either your left or right. Go up and enter the doorway at the bottom of the middle of your screen. This should bring you to a dark classroom. Go left and enter the door beside several grey boxes. Interact with the smiling Sabitsuki in the middle of the room.
Television (テレビ)[]
Become a Television

Appearance: Sabitsuki`s head becomes a television set.
Passive Effect: None.
Action: (Shift) Sabitsuki turns the TV on, which will shut off after a second or two. It`s showing a random image or facial expression each time.
Location: Found in the Ruins in Famicom World.
Practical Uses: Use this effect by Shift key can found out about about the presence of chasers on location.
Follow the Broom effect guide to get to the Famicom World. Instead of heading north to the Witch's House, go south until you barely see the well. Worm through the path in the trees on the right to the next screen. Follow the path along until you see a grassy area. Just before that there's a grey stone block, next to the water to the right of the screen. Enter that and head north and slightly left, heading down the staircase. This'll take you to the dungeons. Once in the dungeon, follow the rooms until the first split in the path. Take the south path, enter the staircase, then take the door to the right. In the center of the room you'll find a TV. Interacting with it will give you the television effect.
Plant (しょくぶつ)[]
Become a Plant

Appearance: One of Sabitsuki's eyes becomes a flower, vines encase her body, and her legs are also replaced with vines.
Passive Effect: None.
Action: (Shift) Sabitsuki becomes overgrown with plants even more.
Location: Found in Illusionary Corridors.
Practical Uses: If it is raining from the Watering Can effect, even more flowers will bloom, making her temporarily immobile.
Follow the guide for the Black Hoodie effect to reach the Industrial Snow World. Go north-east from the door and you should see an entrance blocked off by a smoking pipe. Go right past that and enter the cylinder-shaped building in between two smoking pipes. Interact with the flower and leave. Go down until you're right beside a big smoking pipe, go right and into the entrance that was previously blocked off. Go down the stairs and through the hall. Enter the doorway when the flowers block the way, however instead of going through the door, interact with the vine at the end of the hall and go back the way you came.
You should now be able to go right. Enter the door at the end of the end of the hall. Enter the furthermost door on the right. This will bring you to a room with white flowers. Interact with the biggest one.
Tattoo (いれずみ)[]
Engrave a Tattoo

Appearance: Sabitsuki's eyes wide-open eyes in the shapes of + signs, or crosses, tattoo also appearing on her left shoulder.
Passive Effect: None.
Action: None.
Location: Found on the top balcony of the School.
Practical Uses: None.
Follow the guide for the School Uniform effect to reach the School. When you're in the hallway that takes you down, take the stairs going up instead. Enter the door at either end of the hall. Go up and take the stairs in the middle of the screen. Go left and interact with Smile (the boy on the roof).
Dress (ドレス)[]
Wear a Dress

Appearance: Sabitsuki is dressed in a black mourning dress, complete with black gloves and a veil.
Passive Effect: None.
Action: (Shift) Sabitsuki do a curtsy.
Location: Found in Industrial Snow World.
Practical Uses: When Sabitsuki curtsies near Gas Mask Maid/Cleaner, she bows to her.
Follow the guide for the Black Hoodie effect to reach the Industrial Snow World. Go directly north from the door until you reach three cylinder-shaped buildings. Enter the middle one and interact with the dress on the stand.
Empty Boxes[]
Once you complete the game as Sabitsuki, enter the dream world, drop your effects into the computer (by hitting the center sparkle) and begin the game as Rust, a paler version of Sabitsuki. As Rust, you have no access to the previous effects. However, you do gain access to 3 previously closed off areas. Gaining the Empty Boxes - an unfilled GET item - gives you access to the previously unattainable True Ending.
School[]
Follow the guide for Oreko's Empty Box to reach the Sewers. Once you enter the Sewers, go left and onto the gray platform at the bottom of your screen. Go right to where the giant slime is and go up the ladder next to it. Go right to the rusty pier. From you start, go:Right, Up, Right as far as you can, Down, take the first Right and then Up, Right and Up again. Interact with the streetlamp. Go left and enter the stairway. Go down the stairs. Go up from where you exit and enter the School.
Enter the door to your right. Go left and enter the bottom door. Head down the stairs in the middle of the hall. Go right and enter the door at the end of the hall. Go up and down the stairs above the door where you'd enter to get the School Uniform. Enter the door to your right then go up. Interact with the large mouth on the wall.
Hospital[]
Enter the Pipes World to your left. Go down until you reach a horizontal pipe. Go right and enter the gray building. Go down the stairs to the Apartments. Go all the way to the right and go up the stairs to the rooftop. Interact with the floating block to reach the Isometric Pathway. Take the path going right. Interact with the floating block which will teleport you to another rooftop. Go down the stairs to the Apartments. Go right and take the elevator. Keep going right and leave the Sugar Hole.
Go left and enter the Hospital. Go up and enter the door to the far-left at the back to enter the Meatworks Corridor. Head up and take the upwards path. Head up to enter a bloody hallway. Enter the first door you see. Walk down the hallway and take the elevator. This will take you to the Corrupted Alleyway Hospital. Walk all the way down the hallway and enter the bloody hole in the wall. This will take you to the room of the Bloody Room event. However, you can go through the door. You will be brought to the hall of the Dying Girls event. All of the NPCs will explode simultaneously and you can enter the door on the right without trouble. Interact with the disemboweled girl on the wall.
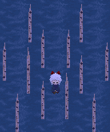
Oreko[]

Pass this thing then turn back to reach Oreko's lab
Head to the Neon World to the right. Turn right until you reach the furthest blue block in the starting area, then head all the way south until you reach the hand. From the middle of the palm, head right again. You'll see two red blobs that appear to be emanating some sort of gas. Walk between them to reach the Heart Tile Path. Follow it along to enter the Hospital. At the 4-way parting, take whatever path has the most blood. This'll get you to the Bone Maze. From here, follow the path north and take the first left. Continue along to the second north path (next to it is a rounded white "bone" covered in blood) and head north. Enter the open, dripping mouth. Go down the ladder to your right and enter the Sewers. Go left and interact with the orange emblem.
This will transport you to the Industrial Maze. Go left and take the first upwards path. Interact with Oreko in the test tube. Go down after doing so and just keep following the newly-created path. It should bring you to another orange emblem that will teleport you to the Orange Stairway. Go down the stairs until you reach an orange circle of some sorts. Turn back and there should be a new doorway between two orange lights. Enter it, go all the way down the stairs and enter the large machine at the end of the hall. Head straight up and enter another doorway. Go down the hall and interact with the Sabitsuki in the test tube.
Collecting all three of the Empty Boxes allows you to see the True Ending. Wake up and save. Hop onto your computer to start dreaming. There will now be an elevator in Sabitsuki's room. Enter the elevator to activate the ending.
Events[]
.flow has a few events that, when triggered, typically increase Sabitsuki's Erosion Counter. This counter is only visible through looking at Little Sabitsuki in the Parade Ward of the corrupted Children's Hospital, and is theorized to represent the amount of damage Rust has done to Sabitsuki. Increasing your Erosion Counter has visual effects besides Little Sabitsuki, such as bloodstains appearing on your floor (and later, your walls) and strange objects attached to Sabitsuki's monitor to appear. Once the Erosion Counter has reached a certain amount of points (where the largest bloodstain is visible on Sabitsuki's floor), interacting with the Little Sabitsuki in the hospital with give you a new menu theme, the Rust Menu.
Bar Kaibutsu[]
When visiting the Sugar Hole, sometimes a normal Kaibutsu will be seated in the furthermost stool. If you attempt to hit them with your pipe, they will immediately kill you with their own weapon. The scene shows Sabitsuki's mutilated corpse in an all-black room, and a door slowly closing on you.
Bloody Room[]
Enter the sewers and go to the right side where the giant slime is. Go up the ladder and check the grates to the north of you - if there is only one, exit and enter again. If there are two, interact with the grate and head back outside. The slime will have changed colour. Move past the slime and you'll get sucked in and teleported to a long corridor. Enter the room at the end to see a giant white room painted in blood. Attempting to enter the room causes any effects in use to be cancelled and the screen to turn to static briefly. Soon, Sabitsuki will start bursting apart from the inside, and appears to grin while she dies.
Candle World Kaibutsu[]
An active fast Kaibutsu that appears in the Bone Maze (The area you enter to reach the Flesh Walls/Sewers). Head right from the staircase then down when you reach a white square object in the ground. You should see a passive Kaibutsu walking about. Equip your Iron Pipe, hit them and then try to run.
Another way of activating this event is entering the Footprint Path, finding and hitting the Kaibutsu with pigtails. This Kaibutsu will trap you in an area in the Neon World with a green cube in it. Interacting with the cube will turn all of the NPC's into green cubes. Teleport to the Nexus using the Arms effect then make your way back to the Bone Maze.
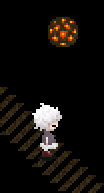
Corrupted School[]

Entrance to Corrupted School
- Having the Ghost effect for this event is recommended.
To access this event you need to enter the Red Eye World to the north. Go right until you see some pale figures with a yellow eye near them then go straight down until you see the entrance pictured here (if the entrance isn't there simply wake up and try again). Equip the Ghost effect and enter the largest ones mouth.
Head straight up (press shift to go invisible as you move along) until you reach the top where three Kaibutsu will be waiting for you. Turn back. The reason you want to be invisible is as you reach the bottom a Kaibutsu much faster than you will appear and will catch you, however there will now be a path to your left that wasn't initially there. Head down it and enter the largest ones mouth. Enter the School.
In the room past the lobby, you will no longer be able to equip any effects. Kaibutsu's with iron pipes will chase you down to the school's basement, where a particular NPC will be waiting for you. The path to the basement is straightforward and you won't be caught as long as you keep moving the whole time.
You can also access this event as Rust by following the path described above. However, instead of Kaibutsu, large Red Demons will chase Rust through the school and will one-hit her if she's caught.
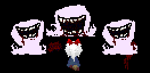
Childbirth[]

Entrance to the Childbirth event (before/after you hit it with the Iron Pipe)
Go to the Apartments that lead to the Sugar Hole cafe. There is a random chance that a face will be above a puddle of blood in the hallway. Equip your Iron Pipe and hit it. Enter into a room very much like the Flesh Walls. Go right and enter the doorway into a room full of black-haired girls. You can either kill them or use the Whistle effect to make them move out of your way. Clear a path to the doorway in the bottom right corner and enter it. You will get stuck in a room filled with the same black-haired NPCs with a large one stuck to the wall. One by one, the smaller ones explode in a pile of viscera before the large one's stomach splits open. Attempting to interact with her will cause the screen to fade out into static and you will be forced to wake up. This event adds points to your erosion counter.
Foggy Kaibutsu[]
Follow the Viscera effect guide up until you reach a hallway that splits off going left and right. Enter the door to your right instead of your left. Go down, head right when the path splits, right again when the path splits a second time then keep going up. You should reach two machine-like pillars. Go between them to reach a peaceful, foggy area. Head left and go between two gray pillars. You will now be in a darker area with a Kaibutsu standing in front of a gaping hole. Hit them with your Pipe and leave. The peaceful area you were previously in will now be full of large holes with eyes as well as Red Demons.
Glitch Event[]
- Note: An event that can only be seen in versions 0.18 and onwards.
Go to the FC Dungeon (follow the path for the Television effect). Take the stairway to the left from the door that you'd find the Television effect, take the next stairway upwards which you bring you to a room. Interact with the top-left corner of the wall. If an empty text box pops up, the event has been activated. As you try to leave, the screen will glitch out more and more as you move further along. You will eventually be taken back to the room where the event was activated. Keep interacting with the wall in the top-left corner. The room will glitch out the more you interact with the wall and the screen will eventually completely glitch/fade out to black while a loud noise blares in the background, after which you will be forced awake.
Gore Demo[]
Collect all of the effects without killing any NPCs or raising your Erosion Counter. The next time you use the computer a little movie will play instead. Several of the major NPCs will pop up along with several scenes of gore. Sabitsuki will wake up and leave her computer when the film ends.
Nightmare Event[]
- An event only seen in version 0.192.
You must have an Erosion Counter of over 250 points to see the event. After you've raised your Erosion Counter to that point simply go to your menu and wake up. It will show Sabitsuki in her bed and a Kaibutsu version will enter the room and hit her with a pipe. Sabitsuki will immediately wake up after this event.
Rainbow Flower[]
- The Watering Can effect is needed for this event.
Go to the Psychedelic Streets via the City Coast (ground level). Go directly south from where you enter until you see two rainbow-coloured pillars. Go inbetween them into a room full of flowers. There will be a wilted flower directly in front of you. Use the Watering Can event to make the flower bloom. Interact with the flower to activate an event where the game screen fills with swirls that flash/change colour. You can exit the event by pressing Z or Enter.
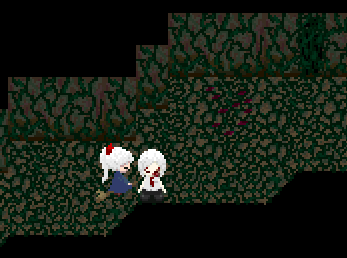
Hole in Girl[]

Enter the Psychedelic Streets at ground-level. You'll find a pink building with two heart signs in front of it. Enter it to reach Sweet Sugar Hotel. Head through the left door. You may or may not have to kill the black monster guarding the last door, enter it and view the door inside - afterwards, go back to the hall. Enter the door with a maid and absolutely no music. Interact with her until you get transported to a dark red and black maze. Walk around until you find a melted puddle of sugar. Interact with it and follow along the hall. You'll see a black haired girl resembling the one from Deterioration standing on the edge of a cliff, with arms reaching down to her. You can't reach her or interact with her in any way.
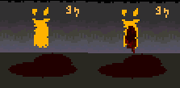
Well Kaibutsu[]
The Kaibutsu that you have to attack
Follow the Gas Mask effect guide to reach the hallway that blocks off where you enter with ivy. There will usually be a passive Kaibutsu walking around. You need to attack them with your Iron Pipe. Teleport back to the Nexus using the Arms effect then make your way to the Famicom World. Enter the well that is south from the path that you'd take to the FC Dungeon. There will now be a Kaibutsu in the well that will trap you in a pitch black area once interacted with.
No Music No Kindness[]
Follow the Diving Helmet effect guide to the Underwater Area. Go north and then turn to the right to entrance between pillars. Go right until you will arrive in Underwater Village. Use the Iron Pipe effect to kill all three guitar guys in Village (there is two in village and one in building with additional dresses). When you kill bards villagers turn into the chasers, or actually they can catch you and lock in inescapable area.
Dirty Deeds Done Creepy Things[]
Follow the Handgun effect guide to the Dark Alleyway. Navigate your way to the left, you should near to small area which blocked by road cones, every time when you goes to this place by random behind road cones you can see one of three things:
- 1. Some hobos with a bonfire;
- 2. Kaibutsu Leader which punch someone in bloody meat mass;
- 3. Strange small laughing short creature;
- 4. Meido/Gas Mask Cleaner in a bloody apron with a chainsaw in her hands.
Also there is a random chance that road cones will be removed and you can enter in that empty area. But when you go back, a some fast distorted cloaked figure will catch you, after that Sabitsuki will be in the closed area with those cloaked figures. To leave this place just find a door in south-east direction.
Smile Without Smile[]
Follow the Black Hood effect guide to the Disposal Area/Underground World. Navigate your way to the area which blocked by bathtub and three boys. Use the Handgun effect to draw attention of boy near to the bathtub, then interact with the bathtub to see his full face picture. Also, to see face of boy with his "tattoos" just use Handgun, but don't interact with the bathtub or by becoming Rust go there and interact with the that bathtub.
Sugar Float Days[]

At least 3,000 yen is required for this event.
After you have eaten cake at the Sugar Hole at least ten times, start a new dream session and visit Sugar Hole again. Interact with the maid behind the counter and in the backroom, then go to the Apartments through the elevator. The area that was previously blocked by a traffic cone will be accessible. Enter it to view the event. You will briefly see a younger Sabitsuki and an NPC resembling the one who appears in Deterioration sharing tea, before the screen flashes and they disappear. This area is one-way and you cannot return from it.
Endings Guide[]
Rooftop Ending[]
Collect all 24 effects, then go outside through the door.
Maid Ending[]
This ending is similar to the Rooftop Ending with a slight difference.
Drop all your effects into the computer (use the computer while in .flow, then walk to the center star and confirm). You will be sent back to the real world. Then go outside through the door.
True Ending[]
- Need to get all Empty Boxes.
Become Rust, then collect the three Empty Boxes. Go into .flow and an elevator will be there in the place of the computer; take it. Then take the very last level of the game. Afterwards, go outside and the ending will play.